Average Ratings 0 Ratings
Average Ratings 1 Rating
Similar Products
-
SmartWindowsAre you able to code, write, program, code, illustrate, or edit images on your computer. It would be amazing if your windows could be placed in the right places and the right sizes for each role, and then restored at the touch of a button. SmartWindows allows you to do exactly that! Switch between the layouts that best suit your coding, gaming, and writing style. SmartWindows will save you time and increase your productivity every day. SmartWindows not only saves and restores application positions, but also remembers and opens files. SmartWindows supports all your favorite applications, such as Word, Powerpoint and Excel, Project, Notepad, Wordpad, Wordpad, Excel, Project, Excel, Notepad, Wordpad, and Project. You will love the freedom and flexibility that comes with multiple monitors. No worries. SmartWindows supports multiple displays simultaneously. You can restore app positions on each monitor.
-
YodeckNext-generation technology for digital signage professionals Yodeck, a cloud-based digital signage platform, is unbeatable. It powers your screen with dynamic content that instantly engages your target audience. Yodeck makes it easy to create, schedule, and design content from the web. To get your message across to those who matter most to you, use attention-grabbing media such as videos, images and PDF files, Office documents, data dashboards, and social media. It provides enterprise-grade security and control. Yodeck's drag-and-drop editing feature allows users to be creative in organizing content into interesting layouts. Yodeck is proud to offer a unique digital signage solution for businesses of all sizes. This includes local diners as well as global leaders like Delta Airlines, Autodesk and Adobe.
-
KamateraOur comprehensive suite of cloud services allows you to build your cloud server your way. Kamatera’s infrastructure is specialized in VPS hosting. With 24 data centers around the world, including 8 in the US, as well as in Europe, Asia and the Middle East, you can choose from. Our enterprise-grade cloud server can meet your requirements at any stage. We use cutting edge hardware, including Ice Lake Processors, NVMe SSDs, and other components, to deliver consistent performance and 99.95% uptime. With a robust service such as ours, you'll get a lot of great features like fantastic hardware, flexible cloud setup, Windows server hosting, fully managed hosting and data security. We also offer consultation, server migration and disaster recovery. We have a 24/7 live support team to assist you in all time zones. With our flexible and predictable pricing plans, you only pay for the services you use.
-
ROLLERROLLER has a proven history of serving over 2,000 clients spanning 30+ countries, including esteemed brands in the attractions industry such as SkyZone, Altitude, American Dream, Uptown Jungle, Flip Out, WhoaZone, Oxygen, Innoflate, and Jumpsquare. We possess an in-depth understanding of the unique requirements of play centers, family entertainment centers, wake parks, water parks, trampoline parks, theme parks, amusement parks, indoor climbing facilities, children's museums, zoos, aquariums, and more. ROLLER stands out as the leading all-inclusive venue management solution for attraction businesses, equipped with a diverse set of features that amplify revenue and streamline operations. Experience seamless ticketing, efficient point-of-sale systems, advanced membership management, and integrated waivers—all in one robust platform designed to elevate your business.
-
ShiftShift is your power browser. The only browser to merge all your applications into one beautiful window. Connect all of your email accounts and manage all your apps from one powerful window. Streamline everything you do online when you install Shift and access thousands of apps without leaving your browser. Tired of juggling apps, hundreds of tabs, and multiple accounts? Most browsers make that feel messy, Shift makes it simple.
-
Miradore MDMMiradore acquired by GoTo in 2022 is a cloud-based Mobile Device Management platform (MDM) that allows you to secure manage both company-owned and personal Androids, iOS, macOS and Windows devices. Miradore allows you to keep up with your device fleet, automate the management of multiple operating systems, distribute business-critical applications, and secure company data. It is easy to get started and it is always free. You can also unlock additional features with Premium plans when you need them. The Premium+ plan offers a 14-day free trial that allows you to test all features risk-free. You do not need to provide credit card information.
-
ManageEngine ADAudit PlusADAudit Plus enhances the security and compliance of your Windows Server environment by delivering comprehensive insights into all operational activities. It offers a detailed overview of modifications made to Active Directory (AD) resources, encompassing AD objects and their respective attributes, group policies, and more. By conducting thorough AD audits, organizations can identify and mitigate insider threats, misuse of privileges, and other signs of potential security breaches, thereby bolstering their overall security framework. The tool enables users to monitor intricate details within AD, including entities such as users, computers, groups, organizational units (OUs), group policy objects (GPOs), schemas, and sites, along with their associated attributes. Furthermore, it tracks user management activities like the creation, deletion, password resets, and alterations in permissions, providing insights into the actions taken, the responsible individuals, the timing, and the originating locations. Additionally, it allows organizations to monitor the addition or removal of users from security and distribution groups, ensuring that access privileges are kept to the necessary minimum, which is critical for maintaining a secure environment. This level of oversight is vital for proactive security management and compliance adherence.
-
Teleprompter.comUse a teleprompter to read scripts, lyrics and speech. It has mirroring, font changes, speed changes, and font changing. The best teleprompter application you can find on the App Store is Teleprompter.com! This app allows you to read your script without worrying about the next line. Teleprompter.com is compatible with iPhone, iPad, and MacOS! It has the following features. - Create and edit scripts on your device - Import Word, Txt and PDF files directly from the cloud - Record Videos within the app - Change the speed of playback - Select a specific time to playback Mirror the playback vertically as well as horizontally Set the font size - Use the Bluetooth keyboard to control playback Customize keyboard shortcuts
-
BrewPOSBrewPOS is an innovative Windows IoT solution tailored for restaurants, aimed at seamlessly streamlining daily operations. This predominantly wired system operates independently of a server and is delivered fully programmed for immediate use. Among its management capabilities are Payroll, EMV chip transactions, employee activity monitoring, pre-authorized credit card processing, and inventory oversight. Additionally, it offers live training with real trainers, comprehensive reporting, automated discounting, trade account management, gift card processing, ticket splitting, customer head counting, table organization, customer record keeping, and advanced features like void comp discount waste overrides and a theft tracking system. The platform also includes extensive employee permissions, ensuring that every aspect of restaurant management can be handled efficiently and securely. With BrewPOS, restaurant owners can expect a robust tool that enhances both service quality and operational efficiency.
-
InnsoftInnsoft is a hotel management software provider that offers a simple, straightforward and value-oriented product. Our intuitive and fully customizable motel software & hotel software will streamline your hotel operations. Innsoft focuses on hotel management software for small and medium-sized properties up to 350 rooms. Innsoft's Check-Inn is a Windows-based, flexible and easy-to-use property management software that is trusted by thousands hotels across the country. Our U.S.-based support experts provide excellent service to our customers, making training and operations fast and easy. Connect-Inn Channel Manager allows you to manage 100+ travel sites from a single platform, while reservations are booked instantly into your hotel software. Include the Connect-Inn booking button to allow reservations to made directly from your hotel's website.
Description
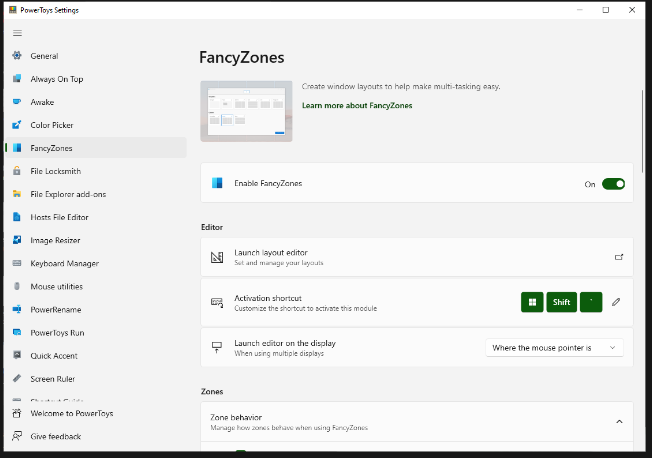
FancyZones serves as a window management tool designed to help users arrange and snap their application windows into optimized layouts, enhancing workflow efficiency and allowing for quick restoration of these layouts. This utility empowers you to specify a series of designated zones on your desktop where windows can be directed. By dragging a window into a predetermined zone or using a designated keyboard shortcut, the respective window automatically resizes and relocates to occupy that zone completely. Additionally, if you have the "Use non-primary mouse button to toggle zone activation" option activated, you can enter zone selection mode by simply clicking the secondary mouse button. When two zones are positioned next to each other, a window can be adjusted to span the combined area of both zones, effectively rounding up to the smallest rectangle that encompasses the two. As you maneuver the mouse cursor close to the shared boundary of two zones, both zones become active at the same time, giving you the flexibility to drop the window into either or both. Moreover, you can drag the window until it activates one zone and then, by pressing and holding the control key while continuing to drag, select multiple zones to expand your layout options. This feature significantly streamlines the process of organizing your desktop workspace efficiently.
Description
Capture images or text from your computer screen by taking a snapshot. You can utilize the Snipping Tool to edit or annotate your captures before saving and sharing them. Additionally, Windows 10 offers another screenshot application that you might find useful. Upon launching the Snipping Tool, you will be greeted with a prompt and a keyboard shortcut for Snip & Sketch. For further details about this application, refer to the guide on how to take and annotate screenshots on Windows 10. You can draw a free-form shape around any object, or drag the cursor to create a rectangular selection. Alternatively, you can choose to capture an entire window, like a dialog box, that you wish to screenshot. Once you take a snip, it will be automatically copied to the Snipping Tool interface, allowing you to make adjustments before saving and sharing your work. To access the Snipping Tool, click the Start button, input "snipping tool" into the search bar on the taskbar, and select it from the generated list, or alternatively, swipe from the right edge of the screen and enter "snipping tool" in the search field. This tool makes it easy to capture and modify screenshots with ease.
API Access
Has API
API Access
Has API


Integrations
No details available.
Integrations
No details available.
Pricing Details
Free
Free Trial
Free Version
Pricing Details
No price information available.
Free Trial
Free Version
Deployment
Web-Based
On-Premises
iPhone App
iPad App
Android App
Windows
Mac
Linux
Chromebook
Deployment
Web-Based
On-Premises
iPhone App
iPad App
Android App
Windows
Mac
Linux
Chromebook
Customer Support
Business Hours
Live Rep (24/7)
Online Support
Customer Support
Business Hours
Live Rep (24/7)
Online Support
Types of Training
Training Docs
Webinars
Live Training (Online)
In Person
Types of Training
Training Docs
Webinars
Live Training (Online)
In Person
Vendor Details
Company Name
Microsoft
Country
United States
Website
learn.microsoft.com/en-us/windows/powertoys/fancyzones
Vendor Details
Company Name
Microsoft
Founded
1975
Country
United States
Website
support.microsoft.com/en-us/windows/use-snipping-tool-to-capture-screenshots-00246869-1843-655f-f220-97299b865f6b